Squid Proxy Server
Basic Configuration
The main configuration file for squid proxy server is /etc/squid/squid.conf.
The Squid Proxy Server has a dependency on a DNS Server. Please be noted,
while configuring the proxy client, what you only need to do is, specify the proxy
server’s address and the port number the proxy server is listen to in the browser
setting. There is no need to define the DNS or Router’s address in the TCP/IP
properties in the client machine.
So, please check the /etc/resolv.conf file whether you have already putted any
‘nameserver’ entry on not. The Squid Proxy Server listens to Port 3128 by default.
And by default it will reject all packets. If you want to allow users from your
network only to get the service from squid proxy server – modify the
/etc/squid/squid.conf file as follows. Here we are assuming our network address
is 192.168.0.0/24.
First of all find out the visible_hostname directive in the squid.conf file. By
default it sets to none. Just below the line # none – place an entry like this –
visible_hostname hostname or FQDN
Now find out ‘acl all’ directive in the file. You will find a line like the following –
acl all src 0.0.0.0/0.0.0.0
The above directive is a way to define every hosts in every network, src keyword
define the “source”, by “all” access control list name. If you move downwords,
you will find a line like this –
http_access deny all
Using the two lines, acl all src 0.0.0.0/0.0.0.0 and http_access deny all, the
squid proxy server disallow all the clients to access the proxy service. If you
replace deny with allow in http_access deny all line here, it will allow all clients
to access the serveice. However our task here is to allow our network only. So
put a line that will define you network with an acl name and allow it using the
http_access directive while keeping the default setting. You can write a directive
like this just after the acl all src 0.0.0.0/0.0.0.0 line –
acl ourlan src 192.168.0.0/255.255.255.0
Also put a line just before the http_access deny all directive like the following –
http_access allow ourlan
While allowing clients, Squid Proxy Server goes through the policy one after
another, top to bottom. If it finds any match related to the current packet, it
takes decision on that - whether the client will be allowed or denied.
To start/stop/restart the squid service you can execute the following command
respectively –
service squid start
service squid stop
service squid restart
chkconfig squid on command will start squid automatically at booting time.
User authenticated access to Squid Proxy
The user can be authenticated from the local system (the squid proxy server) through
ncsa authentication or from an LDAP server like Novell' s NDS or e-Directory or Microsoft's
Active Directory.
I am sending you the ncsa authentication implementation....
1. First of all, create a password file for the users and assign read permission to all.
touch /etc/squid/squid_passwd
chmod o+r /etc/squid/squid_passwd
2. Create Users and Passwords for the users -
htpasswd /etc/squid/squid_passwd user_1
htpasswd /etc/squid/squid_passwd user_2
htpasswd /etc/squid/squid_passwd user_n
3. Modify /etc/squid/squid.conf to support ncsa_auth program
Open the /etc/squid/squid.conf in vi editor, find out auth_param directives, and add the
following line just below the last auth_param directives -
auth_param basic program /usr/lib/squid/ncsa_auth /etc/squid/squid_passwd
Move to acl section in the /etc/squid/squid.conf file - you can find out acl all directive
by pressing
/acl all and press . Add the follwing line -
acl ncsa_users proxy_auth REQUIRED
Scroll down to http_access deny all directive and insert a line at the top as follows -
http_access allow ncsa_users
4. Restart your Squid proxy server -
service squid restart
Web site restriction through Squid Proxy
Open the /etc/squid/squid.conf in vi editor - move to acl ncsa_users proxy_auth
REQUIRED
add a line as follows -
acl blockdomain dstdomain "/etc/squid/blocked-domain-list"
Scroll down to http_access allow ncsa_users
put a line at the top like this -
http_access deny blockdomain
After modification, it will look like these -
...
http_access deny blockdomain
http_access allow ncsa_users
http_access deny all
Now create a file in /etc/squid, named blocked-domain-list
Define the name of th e web sites you want to block as follows -
.xxx.com
.yyy.com
Please be noted, you can only define one domain name in a single line.
Restart your Squid proxy server -
service squid restart
There are several methods of using a block list with squid. One of them is the Malware
Block list. Let us check how to use this list.
Now, it is time to check, the activities of squid proxy server. By default squid
generates log report in /var/log/squid directory. The access.log reports you
information about website access using your proxy server where cache.log and
store.log keep information about cached information. Commands are available
to pipe out information. However, there are so many utilities available in the
Internet to show you information in easily readable format.
In production environment I use SARG – the Squid Analysis Report Generator.
SARG helps you to analysis squid-log information using a browser where you can
categorize information. Top of that it is free.
First of all, download the software. I have downloaded it, sarg-2.2.2.tar.gz, from
http://sarg.sourceforge.net/sarg.php.
Go to the directory where you have downloaded the software and extract it using
the following command.
tar xzvf sarg-2.2.2.tar.gz
The command will extract the file in sarg-2.2.2 directory. Change your working
directory there – execute cd sarg-2.2.2
./configure –-enable-htmldir=/var/www/html/report
It is time to compile and install the software. Execute the following commands –
make && make install
By default the sarg binary directory is /usr/bin, where the sarg configuration file
is saved in /usr/local/sarg directory. The name of the configuration file is
sarg.conf.
Now you have to modify /usr/local/sarg/sarg.conf so that it will find the
access.log file, generated by squid, and generate a report by creating necessary
files in a directory.
In my case, I define minimum parameters like follows –
access_log /var/log/squid/access.log
output_dir /var/www/html/squid/squid-reports
You will find the access_log and output_dir parameters in sarg.conf file. Remove
the # and make necessary changes. In my case the squid directory is created in
/var/www/html directory. You do not need to create squid-report directory, rather
the sarg software will create it. You have to make it sure whether squid has
enough permission to create file there in /var/www/html/squid directory.
Now, generate the report that will be used by “sarg” using the following command
–
sarg –f /usr/local/sarg/sarg.conf
Now, configure Apache to access this report from your browser. What I usually do
is, I put the following Alias directives in my /etc/httpd/conf/httpd.conf file –
Alias /report “/var/www/html/squid/squid-reports/”
Options Indexes Includes
Restart your apache web server. From your web browser see the fascinating
report using – http://squid_server’s_ip_address/report
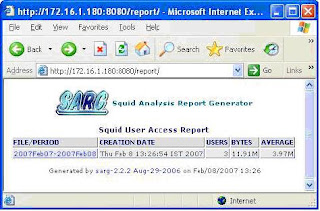
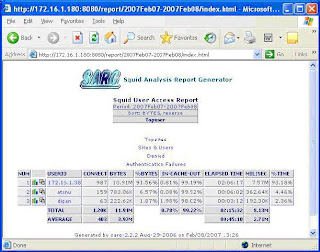
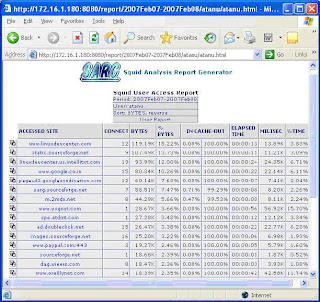
Here I am putting some screen shots –
Thing is that whenever you run sarg –f /usr/local/sarg/sarg.conf, sarg-report
will be created. We can submit a cron job, so that the system will execute it
automatically. In my network, I put the following line after executing crontab –e,
0 * * * * /usr/bin/sarg –f /usr/local/sarg/sarg.conf
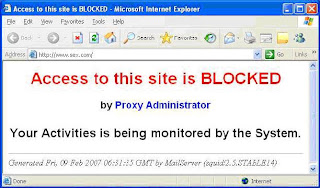
Setting customized message
Create an html file with customized message and save it to /etc/squid/error
directory.
Now put the following directives in /etc/squid/httpd.conf –
acl blacklist dstdomain “/var/lib/squidguard/BL/blacklist”
http_access deny blacklist
deny_info blocked.htm blacklist
Restart squid proxy server and try to access any restricted site, as per
/var/lib/squidguard/BL/blacklist, from your workstation.
See the result in my case –
Labels: configuration, firewall, guide to linux, instalation, linux administrator guide, linux config, Linux installation guide, pocket linux guide, Proxy server, red hat linux guide, squid proxy server